Hello again Travelers! We’re back with our second Making Last Epoch blog post and today we are joined by Wellington Weishaupt, our 3D Modelling Manager! He’ll be sharing some insight into the process behind creating the in game models for the Acolyte’s Necropolis Gear and the Ronin MTX, from ideation to creation to implementation. Over to you Wellington!
Concept? Art!
Everything starts with a concept or idea that should be modelled, rigged, animated and, later on, implemented into the game where players will be able to put their hands on it. Some concepts or ideas might need adjustments during each stage in order to work properly in game, from both a visual and technical perspective, in order to reach the best quality possible while respecting all the limitations.
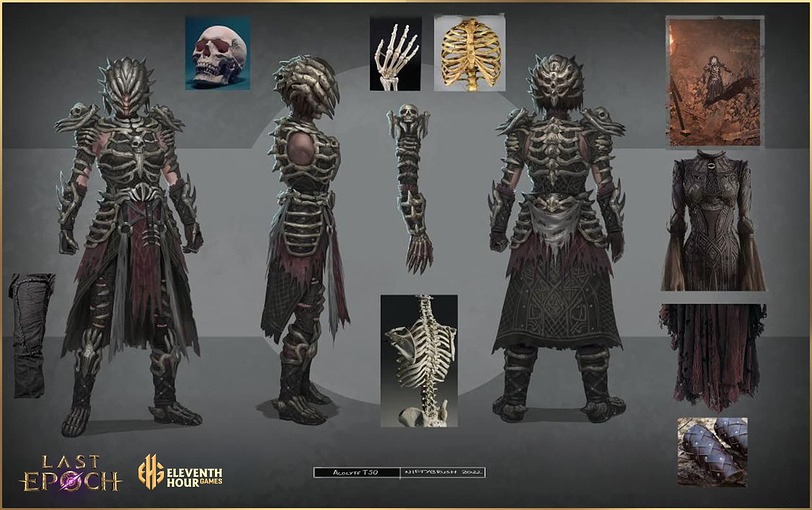
I will be using two gear sets I really enjoyed working on, the Necropolis gear for Acolyte as well as the Ronin MTX Set, as examples to show the different stages of the processes armor models go through in order to get them up and running in game.
From Paper to Pixel
Taking the 2D concept to 3D model
Once a concept is approved, we have the green light to start putting our digital clay together. The first task is moving vertices around, sculpting to make a dense 3D mesh referred to as high poly, this model should hold all the main information translated from the 2D concept. During this stage some design decisions can still happen, for example if there are objects that could limit the movement from our character causing trouble with the animations or making it look off.
The main focus while working on a high poly model is silhouette, the big and medium shapes that give us the right flow, proportions and later on small details such as imperfection on materials, broken parts, and so on.
As we can see above with the Necropolis Set, we have many phases until the High Poly work is done. Sometimes, big changes happen to a design if issues are found during experimentation or simply because something wouldn’t work well in game.
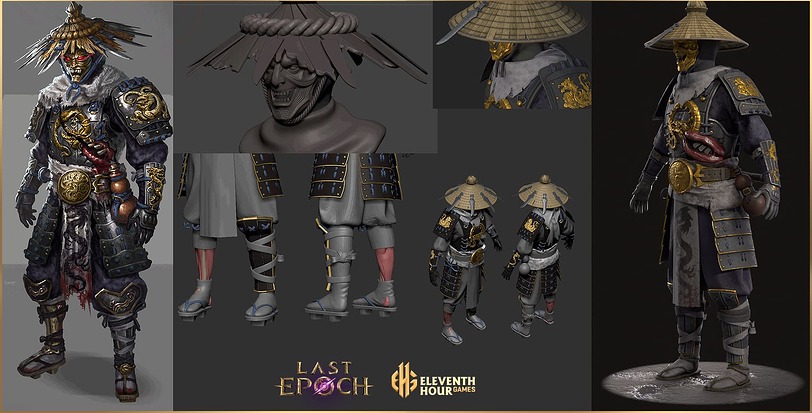
We can see an example of that on the Ronin Set below, which had a few things changed but kept the same ideas. There were some parts that would clash visually in the game at certain camera angles, as too much information would break the visual flow, as well as cause distortions when animated. The ‘mouth area’ on the waist of the original design was one of those parts.
Game Model (re)Creation
Triangles all the way down
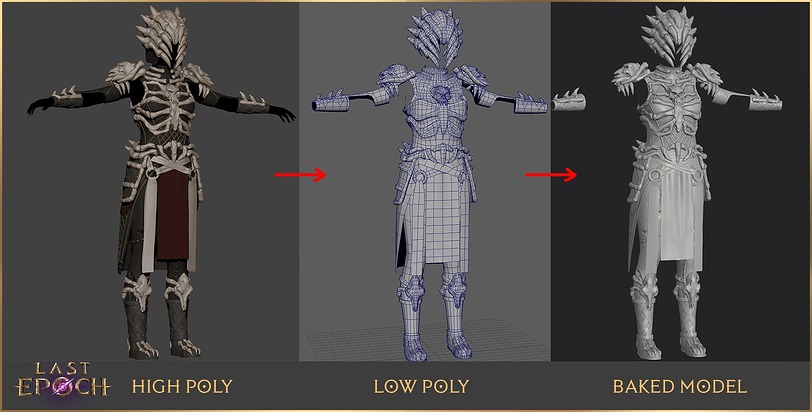
After all the high poly work is done, we still need to do some extra work on this model, reconstructing it and adapting it in order to make it ready for animation as well as optimizing it for use in game. This process of reconstruction is called retopology where, poly by poly, a new mesh will be built up above the high poly mesh.
Hold there, I know it sounds complicated but we can uncomplicate it!
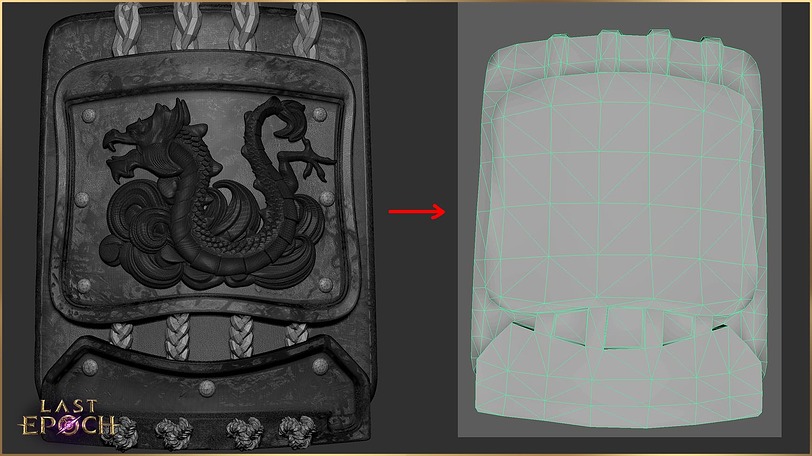
A high poly mesh is usually made of hundreds of millions (yes, you read that right) of triangles which can not be used in game. As we can see in the image below, on the left the Ronin Sets pauldron high poly has an ultra dense mesh with all the hand sculpted details, meanwhile on the right we have the final low poly model reconstructed with fewer triangles.
The first thought that comes to mind is that the low poly looks boring now and has lost all the magic details which brings us to the next stage of the process - Baking!
Baking Last Epoch
Cooking up a storm
With our game mesh optimized we now need to transfer all the information we sculpted on the high poly mesh to our low poly mesh, this process is called baking. With that in place we can work on colors, materials and textures for the assets, however there still another step to prepare our low poly model to receive all this information. This stage is called UV Mapping, it is where we make cuts and unfold our 3D model in a 2D space which can store all the textures in different maps, for example one map will hold colors, another map will store how glossy or metallic surfaces are, so that we can have control over the materials.
After all the pieces have their UVs properly opened and organized we are able to transfer those heavy details to our game mesh and finally work on the textures, below you can see that nothing from our high poly mesh was lost.
Texturing
I have a good feeling about this…
The texturing stage is a very important part of the process in order to convey the correct vision for the materials or tell a story about the assets. We usually try to treat the materials by considering what use it has had by the character and what it has faced during that time.
This is usually a fun part to work on! Sometimes information we add can trigger a lot of ideas even if that something is not that clear at first, for example having some areas with wet blood and some areas where blood appears dry, makes us imagine how over time the character has faced many battles but still faces many more ahead.
Rendered Speechless
You spin me right round
Once everything is finished we record the models rotating in a scene with different light conditions. Turntables not only are a way of showing a final piece but also a great way to observe and make decisions on which parts we can still improve even more.
Thank you to Wellington for such an in depth and awesome look at the work they and their team put in to Making Last Epoch the game we all love. Also thank you travelers for joining us, I hope you enjoyed this as much as I did!
Let us know which teams you want to hear from in future posts and we’ll do our best to wrangle them ![]() Have a great day and safe journeys through Eterra!
Have a great day and safe journeys through Eterra!
Averielle
